In Part 1, I used IBM’s Bob AI to vibe-code a full Oracle recruiting app with no backend code. This article covers the database layer — how I provisioned, structured, and connected a Supabase database in minutes. You don’t need to have built with Bob specifically; this setup works for any AI-generated app that needs a real persistent store.
Why Supabase — and Why It Fits Vibe Coding Perfectly
When you vibe-code an app, you’re moving fast — the goal is to have something functional in hours, not days. The last thing you want is to stop and hand-write SQL migrations, configure a connection pool, or set up a separate auth service. Supabase solves all of that out of the box. Under the hood it’s PostgreSQL — real, battle-tested, relational — but the surface is a web console where you click to create tables, and an auto-generated REST API that your AI-built frontend can call immediately with no backend code.
I chose it for the Oracle recruiting app I built in Part 1 specifically because the AI-generated frontend was already making standard REST calls. Supabase meant I never had to write or deploy a custom API layer. The database and the API were the same thing.
Step 1 — Create Your Supabase Project
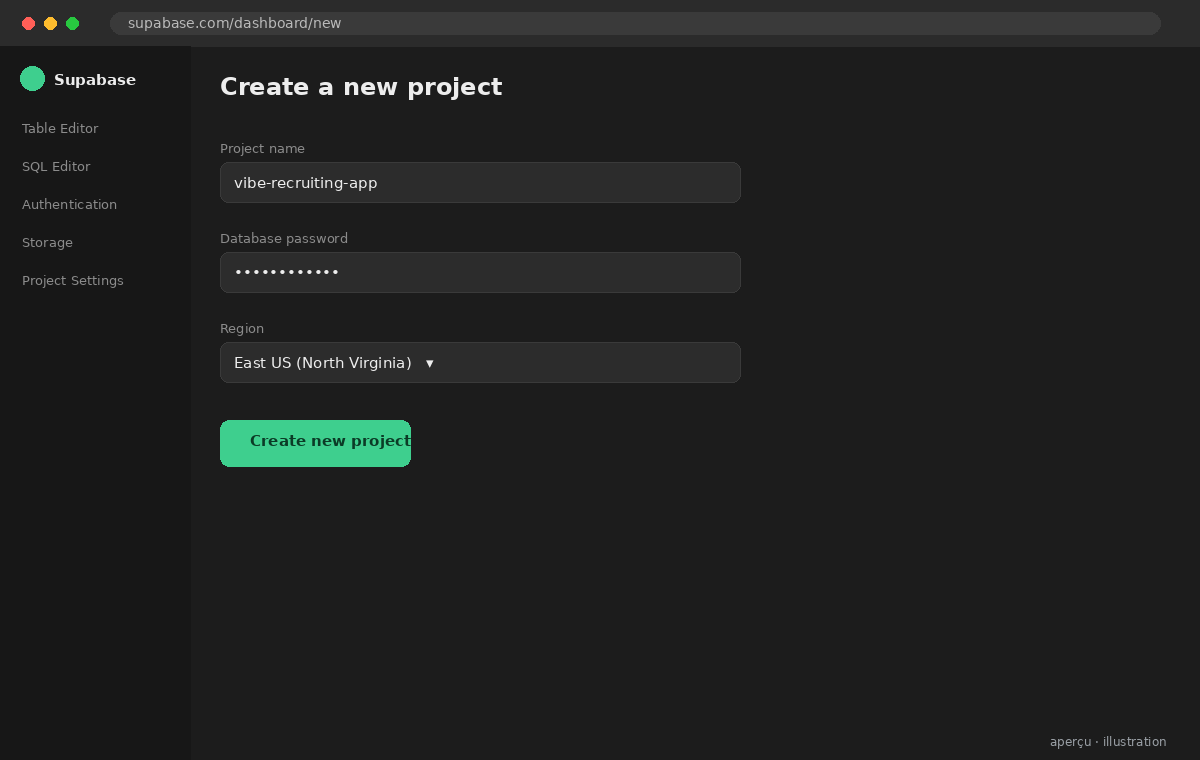
Go to supabase.com and sign in with GitHub. From the dashboard, hit New Project. You’ll name it, choose a region (pick the one closest to where your app will be deployed — this matters for latency), and set a database password. Save that password somewhere — you’ll need it when you connect from Vercel in Part 3.
The project spins up in about 60 seconds. Supabase is provisioning a real PostgreSQL instance, a PostgREST API layer, and a storage bucket in the background. When the dashboard goes green, you have a live database.
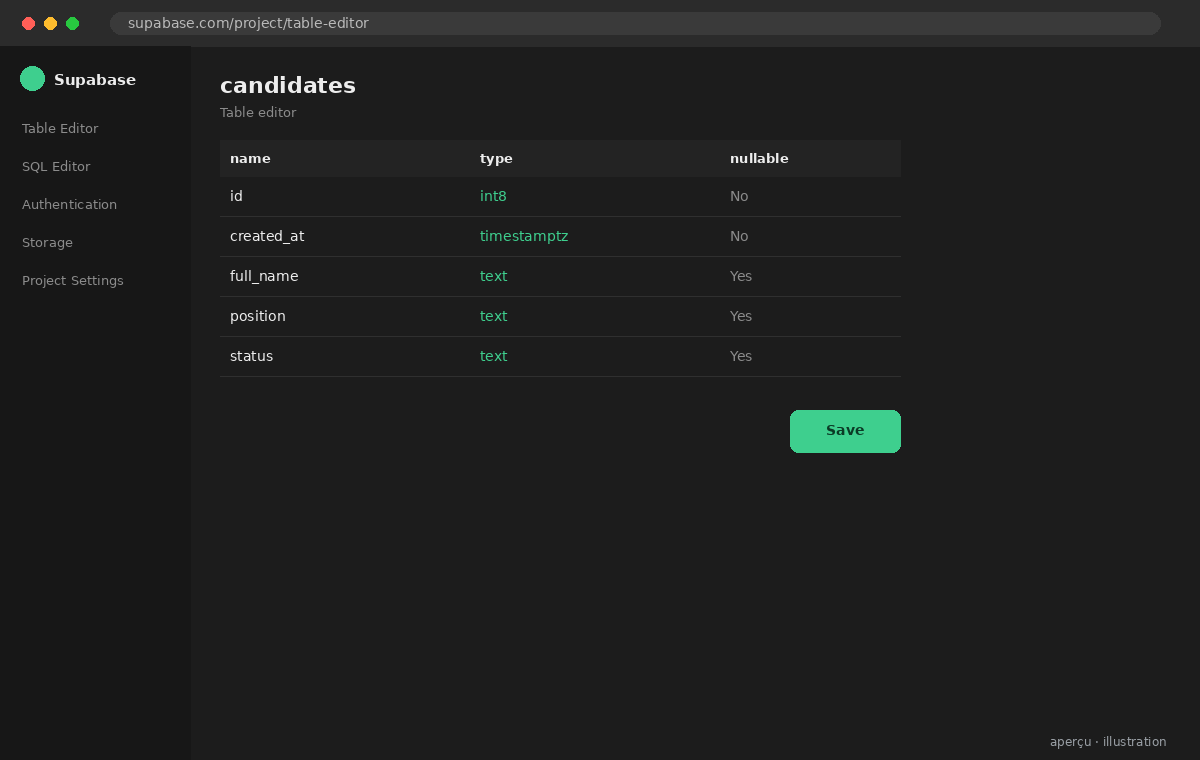
Step 2 — Design Your Schema in the Table Editor
Supabase has a visual table editor — no SQL required to get started. Navigate to Table Editor → New Table. For the recruiting app, I created three tables: candidates, job_postings, and applications. Each table gets an auto-generated id (UUID) and created_at timestamp by default — Supabase handles that for you.
For each table, I added columns using the UI: name, type (text, integer, boolean, timestamptz), and whether the field is nullable. Foreign keys — like linking applications.candidate_id to candidates.id — can be added visually in the same screen. If you already have a schema in mind from your AI-generated app, you can also paste raw SQL into the SQL Editor and run it directly. Both paths work.
Step 3 — Lock Down Access with Row Level Security
By default, Supabase tables are locked — no public access. That’s the right default. For a vibe-coded internal app, the fastest path is to enable Row Level Security (RLS) and create a permissive policy that allows reads and writes from authenticated users. Navigate to Authentication → Policies, select your table, and add a policy. For rapid prototyping I use “Enable read access for all users” first, then tighten it once the app is working.
If your app doesn’t use Supabase Auth and is just calling the REST API with a service role key (common in vibe-coded internal tools), you can bypass RLS using the service_role key. Just never expose that key on the frontend — it goes in your server environment variables, which we’ll cover in the Vercel article.
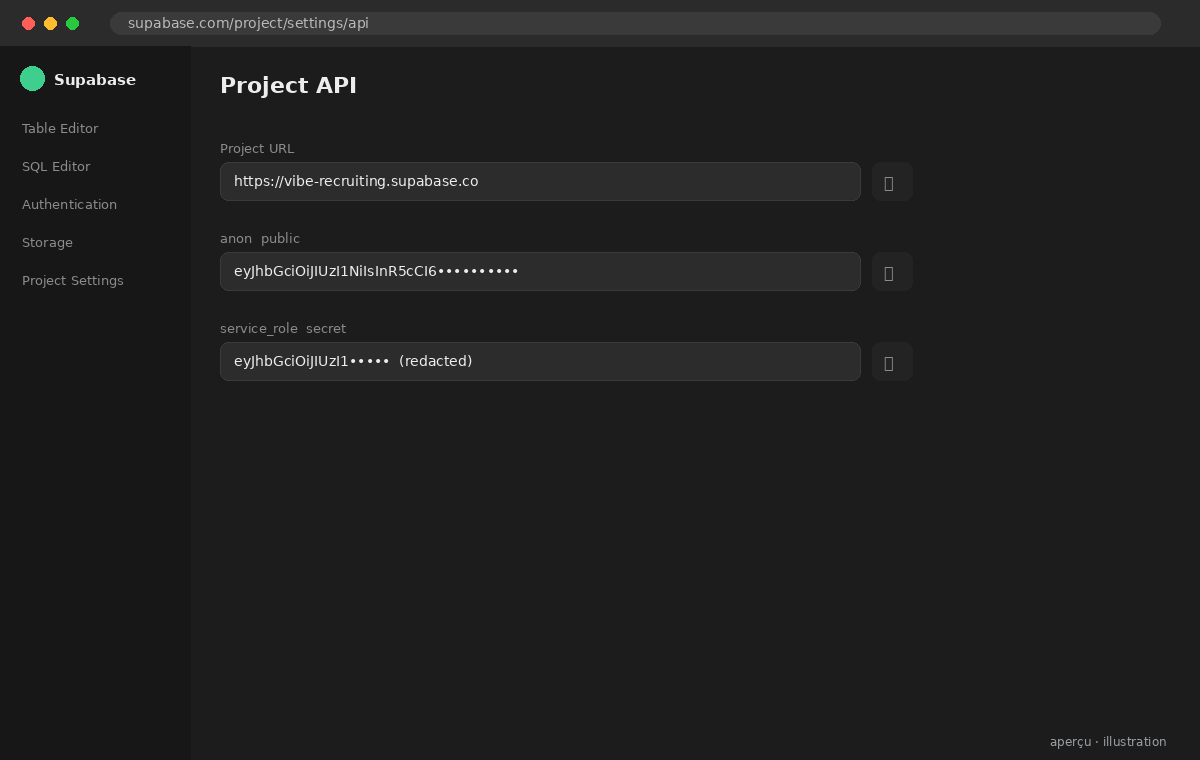
Step 4 — Get Your API Keys and Connection String
Everything you need to connect your app lives in Project Settings → API. You’ll find three things there: the Project URL (your REST API endpoint), the anon public key (safe to use on the frontend), and the service_role key (server-side only, never expose this). Copy these — they are your environment variables in Part 3.
If you need a direct PostgreSQL connection (for something like Prisma or a data migration script), go to Project Settings → Database → Connection String and grab the URI. Use the pooler connection string for serverless environments like Vercel — it handles connection limits properly.
What Was Built
- Supabase Project — PostgreSQL instance provisioned in under 2 minutes, EU-West region
- Schema — 3 tables (candidates, job_postings, applications) with foreign key relationships, built visually
- RLS Policy — Row Level Security enabled with a service-role bypass for the internal app layer
- API Credentials — Project URL, anon key, and service_role key ready for Vercel environment variables
3 Things That Surprised Me
- The auto-generated REST API is immediate. The moment I created a table, Supabase exposed a REST endpoint for it — no code, no restart, no deploy. My AI-generated frontend was reading and writing data within 5 minutes of schema creation.
- RLS is on by default, and that’s the right call. I expected to have to configure security. Instead, I had to deliberately open access. That inversion — secure by default — is the right posture for anything that might accidentally end up public.
- The free tier is actually generous. 500MB database, 1GB file storage, 50MB file uploads, unlimited API requests. For a vibe-coded prototype or internal tool, you won’t hit the ceiling before deciding if the app is worth scaling.
Supabase removed the last friction point that used to make “just spin up a quick database” a 2-hour detour. In a vibe-coding workflow, that matters — the whole point is to stay in flow from idea to working app. Your database is ready. Next up: deploying the app itself on Vercel.
Supabase is the fastest path from “I need a database” to “my app has a database” — without touching a server. For vibe-coded apps especially, the combination of a visual schema builder, an auto-generated REST API, and a generous free tier makes it the default choice. Get the credentials, drop them in Vercel, and you’re live.
Resources: Supabase Documentation · Table Editor Guide · Row Level Security · Part 1: Vibe Coding with Bob

Oracle Cloud Practice Lead & AI & Futuristic Technology Consultant
Christian leads Oracle Cloud implementations and AI-enabled delivery in a consulting context. He writes about the intersection of enterprise architecture, modern AI tooling, and practical delivery at guidibi.com.